Chapter 12: Set
To sum it up quickly, set is basically the same as pulling a rubber band too far, so that it sags and won’t snap back to the original shape. An engineer might say that the elastic limit of the material has been exceeded. The same thing happens with bows and leads to the wood fibers on the belly getting crushed at a microscopic scale. The best way to avoid set is prevention— by using dry enough wood, by tillering well, and by choosing a design with high margin for error.

Before we go into detail about set, let’s talk about string follow.
String follow is the position of the tips relative to the handle, or in other words, the amount of overall reflex or deflex. If the tips sit one inch behind the handle, then you have one inch of string follow.
Now we can explain set, which is measured by the change in string follow resulting from overbending. You can change the string follow of a bow by simply reshaping it with heat, but you cannot get rid of set because the belly fibers are still crushed. So if you shape a bow into reflex by steaming or heat treating, you’ve changed the string follow by moving the position of the tips—but any set is still there, because the belly fibers are still crushed, and you cannot simply uncrush them.
To recap, string follow is the position of the tips. Set is the change in string follow. We can see that set is highly related to string follow, but not exactly the same thing. These terms are frequently confused because—for a straight stave bow, including the one we’re making—the string follow will be the exact same number as the set. This has led to the popular belief that set and string follow are interchangeable, but that’s only true for the narrow case of a bow that starts off straight.
Set happens, you’ll always see a little bit. How much is ok does depend on the design but it’s also a bit personal. For a design like this, skilled bowyers will typically aim for less than an inch of set. Don’t be disappointed if that doesn’t happen, most first time bows I’ve seen hang around 2 to 3 inches of set. Bows with a lot of string follow due to set can still shoot very well, they’ll just be a bit slower shooting. Many of my early bows took a lot more set than that and are still great shooters, they’re just a bit on the slow side for their draw weight.
This is where choosing a high margin-for-error design really pays off. I wouldn’t call my tillering job on this bow perfect, but because of the wide margin in the design, the bow was never significantly overstressed. This design actually does very well with a bit of string follow; many say that about an inch is the sweet spot. So don’t panic when you see a bit of set, but do pay attention to where exactly it happens, because this is one of the best ways to know where you should tiller next, and which areas you should leave alone.
One more thing: the best time to measure set is right after shooting, because this gives the best visualization of how stressed the bow is when it’s actually being used. Sometimes a bow will creep back into reflex hours after shooting, but this doesn’t matter in terms of set, because it has no bearing on the shooting performance of the bow. You want to know how stressed the bow is when it’s actually being used, not when it’s at rest.
Let’s get back to the bow, that’s enough theory for now. So far we’re looking at about a half inch of set —nothing to worry about.
Set is the bow telling you how comfortable it is doing the job you’re asking it to do. A little bit of set is totally natural but excessive set means next time you could do with a higher margin-for-error design, do a better job with the tiller, or insure your wood is sufficiently dry.

I said before that the best way to stop set was prevention. The main causes of set that are avoidable are excess moisture in the wood, not enough margin-for-error in the design, and poor tillering. There is another way to prevent set from happening—heat treating.
I don’t recommend heat treating unless you’re already pretty comfortable building bows. You can ruin your bow pretty quickly with a bad heat treat. This section isn’t a comprehensive guide to heat treating, I’m just showing one way I might do it.
Heat treating seems to make woods stronger in compression, but can also increase the brittleness of the wood. So the woods that respond best to heat treating seem to tend towards being very tension strong and prone to set. This includes the vast majority of the so-called white woods, especially hickory, maple, ash, elm, hazel etc.
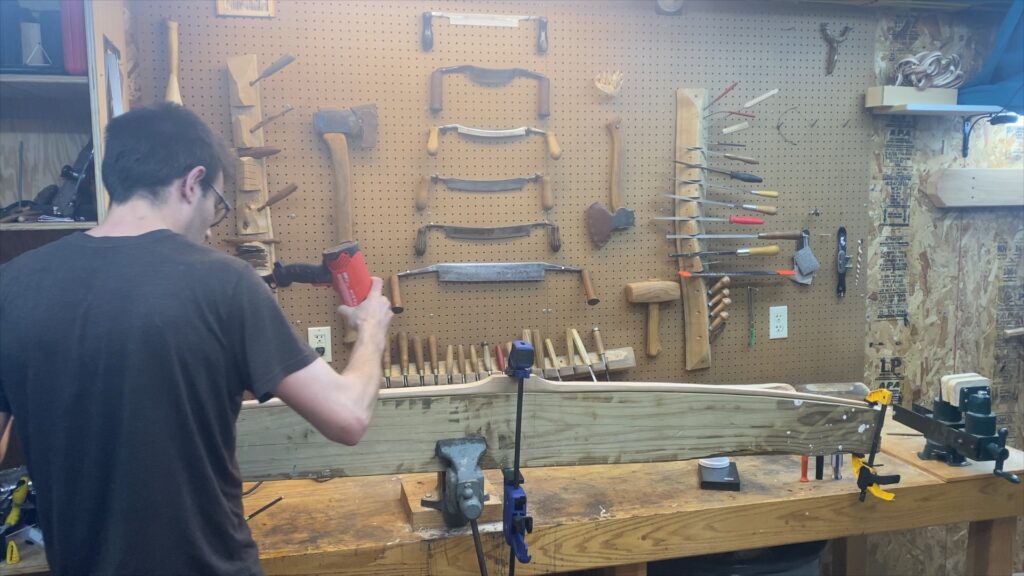
There are many ways to heat treat. The default seems to be the heat gun, but I’ve also used coals, silicone heating strips, and space heating radiators. The idea is to get the belly hot enough that the wood fibers plasticize. Then you want to hold the wood there until it begins to toast. When the belly cools again, it will slightly condense and increase in density. You don’t want to heat treat the back, as this will make it brittle.
I’m only giving this bow a very light heat treat, the goal is just to prevent much more set from developing. I’m also clamping the bow to a reflex form but I’m not trying to reflex the bow so much that the finished bow will be reflexed. I still want a nearly straight bow when I’m done, with just a little bit of string follow. You’ll hear that reflex will make your bow faster but it also stresses the wood more, so it’s easy to bite off more than you can chew.
If you decide to add reflex to any bow, proceed with caution and awareness about the material limits. Also keep in mind that reflex will exacerbate any string alignment issues and set. While reflex can eliminate string follow, since it increases the stress on the limbs it is likely to increase set.

I’m keeping the heat gun moving at all times so that the wood never burns. You want to absolutely avoid scorching the wood. If you only move the heat gun slowly or keep it still, you need to keep it far away. If you put the heat gun really close to the wood like I’m doing, then you need to move it really fast so you don’t burn anything.
I like to heat treat for about 45 minutes a limb, or up to 2 hours per limb for deeper heat treats. This time I’m going for about 20 minutes a limb since its just a light treatment. Keep cooking the wood for as long as you can before it starts to toast, and then try to toast the belly as evenly as you can. In this case I barely even toasted the wood since it was such a light heat treat.

Mervyn Patterson
Hi, congratulations on your full tutorial.It was very well done,easy to follow and understand,one of if not the best tutorial I have seen.Thanks very much I as a amateur bowyer found it most informative but being English my experience is more toward the English Longbow or D section bow.I have had some success with Italian and Pacific Yew.After seeing this I will have a go at a flat bow.
Best wishes Mervyn Patterson UK.
dansantanabows
Thanks Mervyn. In the UK also keep an eye out for Ash, Elm, and Hazel. On facebook there’s a UK bowyer’s group you may want to check out. There’s probably someone close to you who can show you the ropes. There are also several UK bowyers on the other groups and r/bowyer. Good luck and enjoy the journey!
Duke
I am very new at this and can’t wait to start. thank you very much for these easy-to-follow instructions and video. As soon as I obtain the equipment and a good piece of wood I will try to follow your directions.
thanks again and be safe
dansantanabows
Glad to hear it Duke. Hope to see your bow on r/bowyer one day. Good luck and feel free to post as many tiller checks as you need
Gingdah
I enjoyed the detail that you have. This one of best Detail videos on making a bow I seem.
Tyson
Picked up a red maple board and a draw knife today, getting started this weekend. Can’t thank you enough!
dansantanabows
That’s awesome! With red maple I’d go for a slightly wider bow than I have, maybe 2” wide, or a slightly lower draw weight of 30 or 35 pounds. Next time if you can, try to get one of the maple species categorized as a ‘hard’ maple like sugar maple. Silver and red are a bit less dense, but don’t worry and it won’t stop you from making a bow. Just pay extra attention to the set and drop off the draw weight if you start seeing more than a couple inches.
Good luck and feel free to post as many tiller checks on r/bowyer as you need
Tyson
Thanks, Home Depot was my first stop for lumber, red maple was the best they had in hardwood planks at the moment, excluding mahogany. I did notice the porousness so went with the best most dense board I could find. I’ll post my progress!
Terry Bowmam
I am not able to get bow wood boards around here to sort thru.
I can get Black Walnut or Eastern Red Cedar bow making lumber, but requires a backing. I don’t want to waste my hickory backing yet, been a long time simce I made a wooden bow.
My question is, will that linen backing in your video be strong enough, with some reflex? Or maybe double it?
Thanls
dansantanabows
I’m not a big fan of doubling up on the backing because of the extra mess and glue line. Better to use a thicker backing from the start. I think with ERC lumber you’re probably going to need a hard backing unless you find a miraculously clean and straight board. With natural staves, if you’re able to chase or almost chase a ring then ERC can handle being unbacked, despite the popular advice. The problem is that the other popular advice for ERC is that it’s ok to violate the fibers on the back. This is only true to an extent and I wonder if this practice has much to do with juniper’s reputation for breaking in tension.
John Halverson
You would NOT be wasting your hickory backing on an Eastern red cedar board (so long as the board is fairly decent grained with few or no knots). In fact, Hickory backed eastern red cedar (often called HERC) is considered a superior combination for high speed, high efficiency bows.
dansantanabows
I will write more in the future as my formal ideas develop. My informal ideas are easily found on r/bowyer. Thanks for this backhanded compliment, I think.
Pat
I’m impressed, I must say. Seldom do I encounter a blog that’s equally educative and amusing, and let me tell you, you’ve hit the nail on the head.
The problem is something which too few people are speaking intelligently
about. I’m very happy I stumbled across this during my hunt for something concerning this.
Kevin
G’day Dan, fantastic tutorial. I have always wanted to make a bow and I would like to thank you for putting the time into your channel. I live downunder and I am trying to work out what local timber I can use. After watch this I think I will try to practice on a fine grained timber and will certainly look what is in town at the hardware as well. Thanks again. Cheers Kev
Rex
G’day Kevin, I’ve heard quite a few say Spotted Gum is a good option of you find a nice board. I couldn’t find any it the right size at my local timber supplier so I opted for a really straight bit of Jarrah as it’s properties looked similar to hard maple (density, elasticity and modulus or rupture), hopefully it will work. Some others have said iron bark could work for a bow, but that stuff is so hard it makes it difficult to shape.
Rex
G’day Kev
I’m keen to try this out as well. I’ve heard Spotted gum is a good option. I’m going to try it with some Jarrah. Ironbark might work but that stuff’s really hard, shaping it will probably be a pain and lots of tool sharpening.
Cheers,
Rex
Rex
G’day Kev
I’m keen to try this out as well. I’ve heard Spotted gum is a good option. I’m going to try it with some Jarrah. Ironbark might work but that stuff’s really hard, shaping it will probably be a pain and lots of tool sharpening.
Cheers,
Rex
Mickey O'Neill
Dan–My son and I have decided at the same time to get into traditional bow-making. We shot off and on for years, and really enjoy being out in the fresh air and sunshine losing arrows together!
We both truly appreciate your teaching style and the beauty of the videos you’ve made. Thanks for your generosity!
We both went to the store and got red oak boards for our first bows. That is some hard wood! It’s pretty slow going for the moment, but we’ll see how it goes as we progress.
We share the ultimate goal of crafting character bows out of wood we harvest for ourselves. We’re in Oklahoma, and tried over 20 years ago to make a bow from a piece of Osage Orange. Our attempt still hangs in my office! Hopefully, with your tutelage, we will produce something that shoots!
dansantanabows
Good luck Mickey! I heard from your son on reddit last week and am very glad to hear you’re taking on the project together. Let me know if you have any questions or trouble, and feel free to post as many tiller checks on reddit as you need. Go make a bow!
Ross H
Dan, I loved this tutorial. Extremely helpful, a friend of mine and bowyer, Correy Hawk pointed me to your video. I had a question regarding the scale of the bow.
If I wanted to follow your tutorial to make a kids bow (for a 3-5 year old) how does this scale down from the longer ones you make?
Thank you.
dansantanabows
Correy is an awesome bowyer and teacher. I would love to film one of his classes someday. To answer your question it depends a lot on the design. The absolute easiest way is to copy other kids bow’s dimensions that you see on other forums. Of course you can only copy the rough out dimensions since the true dimensions will be revealed by tillering. For a same length bow you can adjust the draw weight by scaling the width. And as a rough rule of thumb you can estimate the bow length by doubling draw length and adding on the length of your stiff handle, and adding a few extra inches per limb for stiff tips. This will give you plenty of margin for error. It’s possible to make a bow shorter but that will give you a nice safe length.