Chasing a Growth Ring

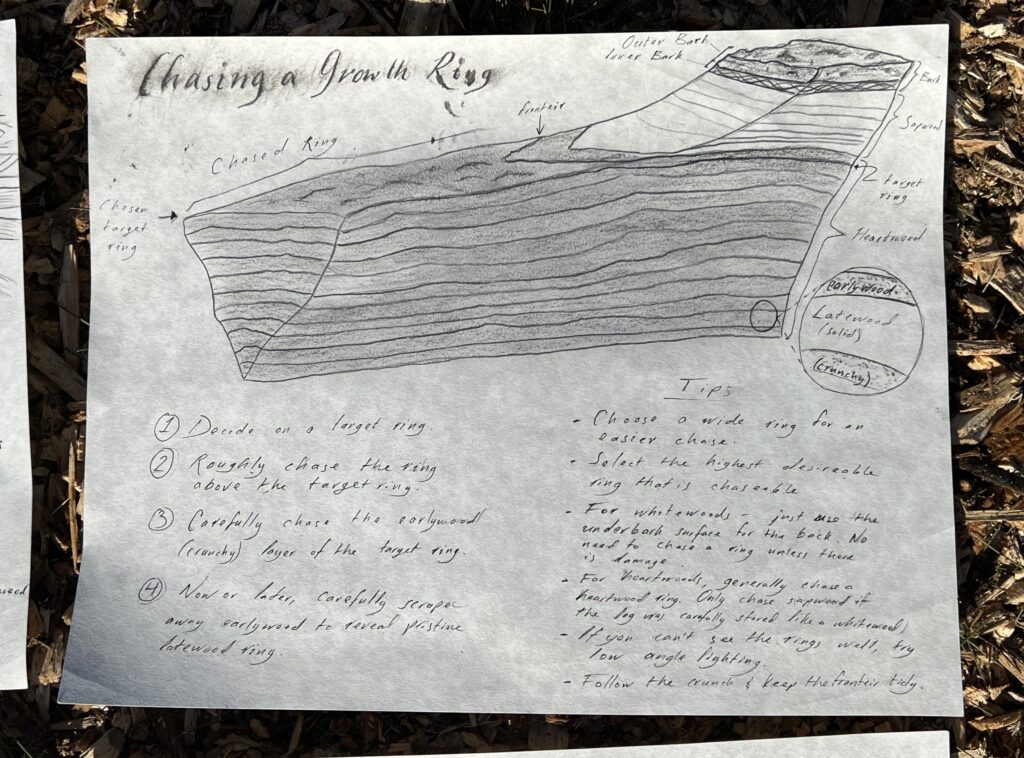
We said before that the back of the bow is ideally made of a single, unbroken strip of fibers, all the way across the back. Conveniently, trees grow in bundles of strips of fibers that we call growth rings. We call it a ring, but really the shape of the growth ring is a hollow cylinder like a pipe. When you look at the endgrain, that’s when you actually see a ring.
Each growth ring can be divided into a smaller ring of earlywood, and one of latewood (see video.) The early wood is porous, crunchy, and grows in the early part of the growing season. The latewood is solid and feels smooth and silky when you carve into it, compared to the crunch of the early wood.
Before we start let’s explain the the goal in chasing a growth ring. We want to make the back an entire solid latewood ring, while damaging that ring as little as possible. Make sure that if you chase a ring, you actually need to. If the stave already has an unbroken latweood ring across the back, you’re good to go and should just use a natural back like in the previous chapter.
Chasing a growth ring should be reserved for situations where the back of the stave is damaged, or for woods where the heartwood is more desirable, such as osage.
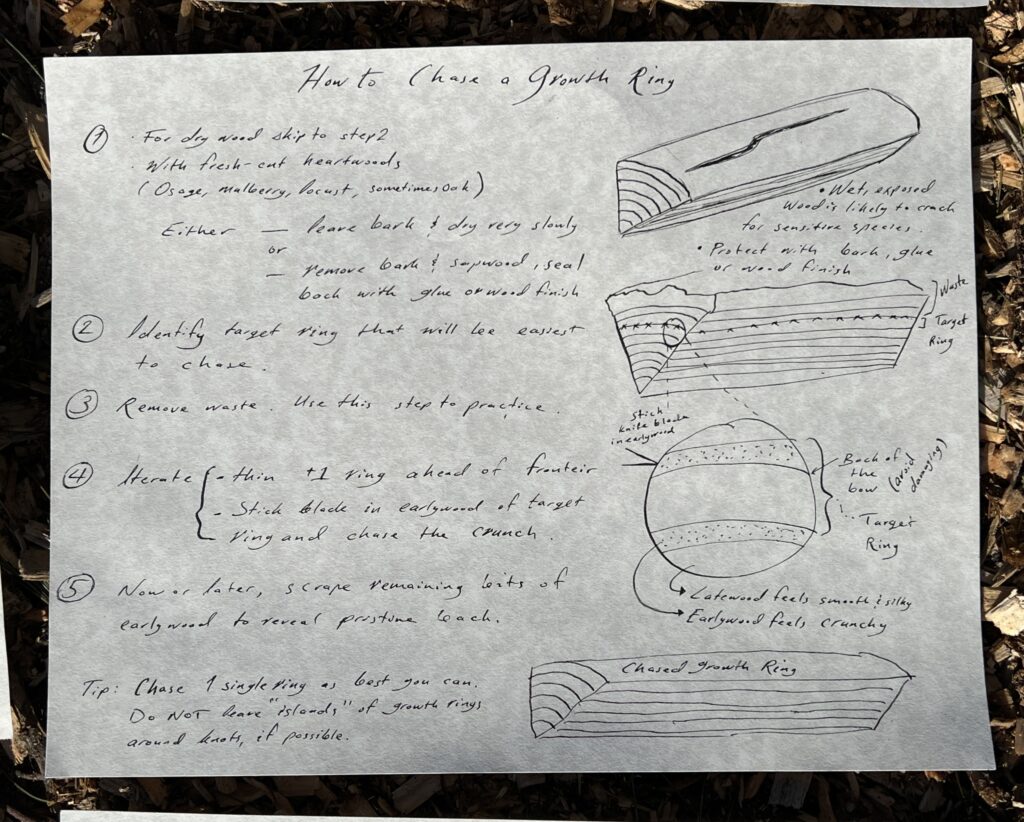
That said, even for those woods you don’t strictly have to chase a growth ring. For example, if the sapwood on osage is not rotten, and has been well dried, it can be used for the back of the bow. The reason this isn’t very common is that only the heartwood of osage is rot resistant. If you want to use osage sapwood, it needs to have been dried and stored as if it were a white wood, with the goal of preventing rot. If you buy an osage stave, chances are it was stored in conditions that are OK for the heartwood but not the sapwood. It’s common for osage staves to have partially rotten sapwood. The other reason osage sapwood is not very common is that it’s hard to dry osage staves with the sapwood on because the sapwood is prone to cracking as it dries. Removing the sapwood encourages safer drying, as does drying with the bark on. Don’t remove the bark if you don’t plan to remove the sapwood.
Ok, lets get started with the ring chasing.

The task is to follow a crunchy earlywood ring all the way through the stave. Once you’re all the way across, that crunchy layer can easily be scraped off, revealing the latewood ring that was actually the target.
-The next step is to read the map formed by the growth rings: first choose and mark the ring you want to chase, then identify the high rings and the low rings above and below the target ring you’ve chosen. It’s very easy to get stumped here: when you’re in doubt try varying the angle of your light source. Low angle light can really help make sense of things when you’re confused.
-You can also use this simple test to verify if a ring is above or below. Sometimes it’s hard to tell (See PDF notes on the first page for a downloadable diagram).
When you’re carving on the frontier between two rings, if the frontier keeps moving ahead of your knife, you’re on the right path and you’re removing higher up growth rings. If you notice the frontier go in the other direction—if it goes behind your knife, this means you just gouged into a lower down growth ring. Stop as soon as possible. The earlier you notice this, the sooner you can stop making the problem worse.

We’re starting off by taking off those high rings. You can use these as an opportunity to practice and get used to the way it should feel. If you mess up at this point its not a big deal because if you cause tearout this will only impact the ring you’re on and any that are above it. As long as you’re reading the map correctly the tearout won’t travel down into deeper rings.
Listening and feeling for vibrations is as important is looking at what you’re doing. Make sure you feel those crunchy vibrations because the minute you don’t you may have veered off track. Try to keep a loose grip on your knife so you don’t mute those vibrations and try to follow them as best you can.
By the way, often you will hear advice to leave little islands of growth rings surrounding knots. Personally I feel this is bad advice when it comes to ring chasing and creates problem areas where splinters can lift. As much as you can, try to chase one single growth ring all the way through the stave.
Once you get all the way across a single crunchy early wood ring, you can be done for now. You can either remove the crunchy layer now, or save it for later in the process, to keep the back from getting scratched during the rough work. Taking off the crunchy layer is easily done with a scraper.
Tool choice is a slightly contentious issue when it comes to drawknives. Some bowyers prefer a dull knife for ring chasing, and others a sharp one. There are advantages to both. Dull knives are incredible for controlled splitting and situations where you want to go with the grain. If you’re having trouble with a sharp knife digging into spots where it’s not welcome, then give a dull knife a try and youll have an easier time following the contours of the wood without nicking it.
Personally I like to use as sharp a knife as I can get away with. The advantage of a sharp knife is that you don’t have to apply as much force to make the same cut. If you can control it, a sharp knife will reward you with additional finesse. The choice also depends on the type of wood you use. For tough white woods like hickory, ironwood, and elm, I find a sharp knife much more useful. Osage is pretty easy to carve in comparison and it yields to a dull knife without putting up much of a fight. The dull knife also only really works for ring porous woods like osage and ash, where you have a distinct crunchy layer you can follow. For diffuse porous woods like maple, I find a sharp knife much more appropriate. If you can chase rings in maple, you can chase rings in just about anything.